In this article, you’ll discover how to create a voice marketing funnel that increases social media reach and engagement.
Looking for a unique way to increase your social media engagement? Have you considered gamifying an Alexa flash briefing?
Using Voice Technology to Improve Social Media Engagement
Voice technology is becoming increasingly prevalent with the explosion of Amazon Alexa, Google Assistant, Samsung Bixby, Microsoft Cortana, Apple Siri, and other smart assistants. In fact, smart speakers/voice assistants are already the most rapidly adopted consumer technology in history, with one in four Americans owning a smart speaker.
This has allowed for the development of a novel distribution channel of audio content through Amazon Alexa, known as flash briefings. You can think of flash briefings as brief podcasts, often referred to as briefcasts. (The terms flash briefing and briefcast are used interchangeably.) Briefcasts are free and typically 1–2 minutes long, and users subscribe to topics of interest through their Amazon Echo devices.
Once subscribed, users simply ask Alexa for their daily news and the smart speaker will play their personal curated list of briefcasts. The typical user listens to briefcasts during transitional moments of the day: brushing teeth, getting dressed, and making breakfast. As society moves toward short-form audio, the opportunity in flash briefings is increasing every day, and the space is wide open for marketers.
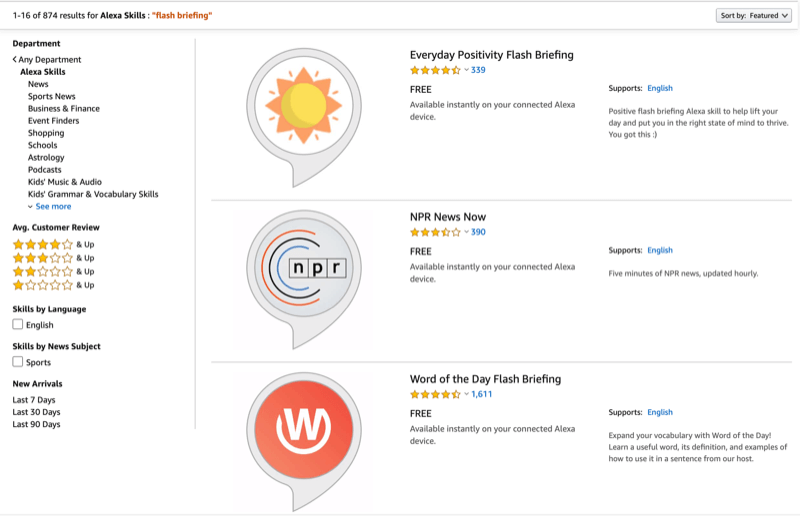
Now is the time to start thinking about a strategy to get your message out via a flash briefing. The process for creating a flash briefing is similar to creating a podcast, except that the flash briefing skill has to be set up in the Amazon Alexa Developer Console. This process is free and there are some excellent resources to help you create a flash briefing very easily.
Once you’ve decided to create a flash briefing, the key question is: How do you leverage the voice technology to increase engagement with your brand on your social media channels? With a voice marketing funnel.
A Successful Case Study Example
A voice marketing funnel designed to increase social media engagement was a unique concept that to my knowledge hadn’t been done before I experimented with this process. And as you’ll see in a moment, the results exceeded expectations.
Here are the details of what I did and how I came up with the strategy so you can capitalize on this opportunity, too.
I’ve been committed to recording daily flash briefings since the technology was launched. I wanted to do something special to celebrate the 500th episode of the Voice in Canada flash briefing, thank listeners for supporting the show, and thank my podcast guests for taking the time to be interviewed.
I also wanted to see if I could increase social media engagement through this process. So I decided to create a gamified flash briefing and voice marketing funnel to reward listeners, feature guests, and increase social media activity.
Because flash briefings are a one-way content distribution channel (the user currently can only listen, not respond, to a briefcast), the first challenge was to figure out how to allow listeners to interact with the brand through the content they would hear on the briefcasts.
To do this, I developed an interactive Amazon Alexa skill (or voice app) called Crack the Code that would allow listeners of the flash briefing to play the game based on what they heard in each episode. I used the VoiceXP platform to develop the Crack the Code skill and deployed it to all five English-speaking regions that Amazon supports (United States, Canada, United Kingdom, Australia, and India).
Each day for 2 weeks, listeners of the flash briefing would listen for a riddle that they would try to solve. When they thought they solved the riddle, they’d talk to the smart speaker to interact with the Crack the Code Alexa skill, and test their luck (and brain) at solving the riddle from the flash briefing. If they could solve the daily riddle, they were given one piece of the final code.
If people successfully collected all of the puzzle pieces for the full 2 weeks (14 puzzle pieces in all) and used these to crack the final code through the Alexa skill, they were eligible to win the grand prize package (shown below). The skill was designed so that to be in the running for the prizes, users would be directed to my website where they would enter their email address (i.e., opt in) and record the answer to the final code.
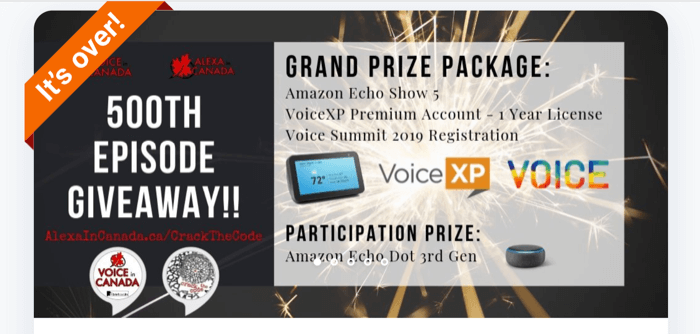
Users could earn additional entries for completing different tasks such as subscribing to my podcasts and flash briefing and sharing the contest on social media. The reward system for sharing the contest on social media had dramatic results on engagement. The tool I used to keep track of the contestants for this part of the experience was KingSumo, a free contest app.
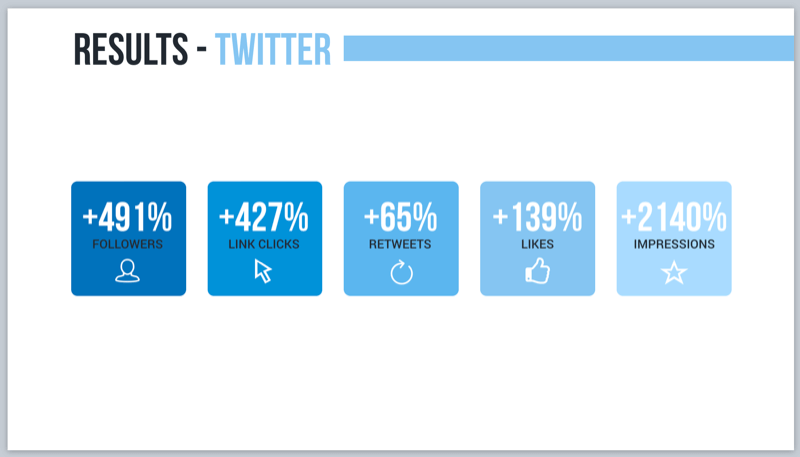
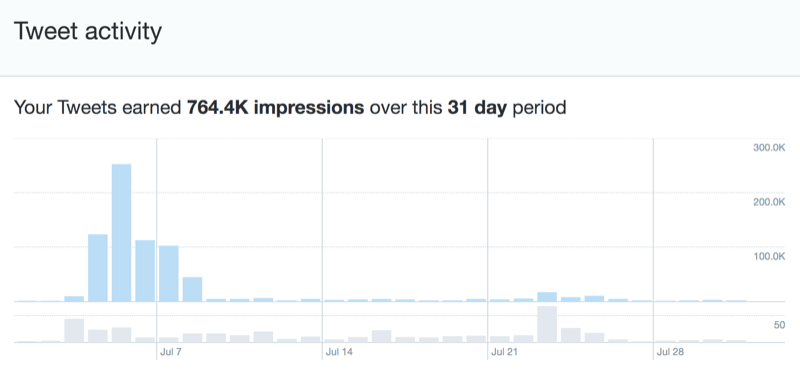
The results of the voice/social marketing campaign exceeded expectations. Comparing the 2 weeks of Twitter activity before the launch of this campaign with the 2 weeks during the campaign showed incredible results. In particular:
- New followers increased nearly 500%.
- Link clicks were up more than 400%.
- Retweets jumped 65%.
- Likes grew nearly 140%.
- Twitter impressions exploded by more than 2,100%.
The graph below reveals a dramatic increase in Twitter impressions from baseline, especially during the first week of the campaign (starting July 3).
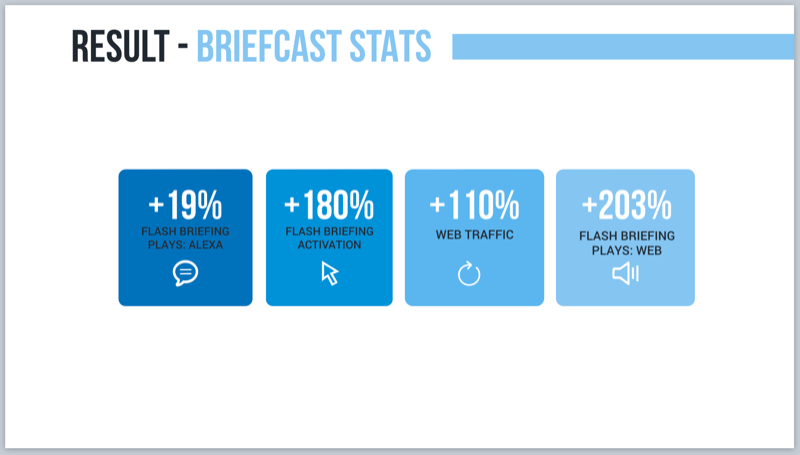
Additionally, web traffic and flash briefing downloads showed significant increases during the campaign compared to the 2 weeks prior. In particular:
- Flash briefing plays on Amazon Alexa increased by 19%.
- New flash briefing activations on Amazon Alexa were up 180%.
- Visits to the website increased by 110%.
- Flash briefing plays embedded on the website grew by more than 200%.
Now let’s look at how to set up a voice marketing funnel with Amazon Alexa for your business.
#1: Plan Your Voice Marketing Funnel Strategy
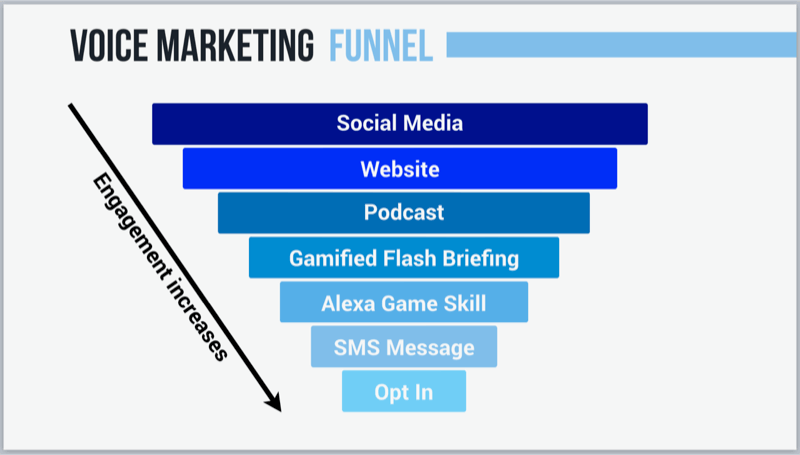
The purpose of a voice marketing funnel is to encourage people to engage with your brand through increasingly intimate and committed levels of interaction, with voice technology/flash briefings at the heart of the funnel and strategy. The core goal is to convert listeners to your email list.
The initial exposure of an audience to your brand—and the top of the voice marketing funnel—is often through a social media channel (Facebook, Twitter, Instagram, and others). If users are sufficiently interested, they can visit your website, listen to your weekly podcast (if you have one), and/or subscribe to your daily flash briefing.
If they continue to engage, they may interact with your branded Amazon Alexa skill and ask to have information sent to their mobile phone from that skill. At the bottom of the funnel, they can opt in and provide an email address.
The graphic below illustrates the increasing level of engagement users have as they interact with your brand and progress down the voice marketing funnel.
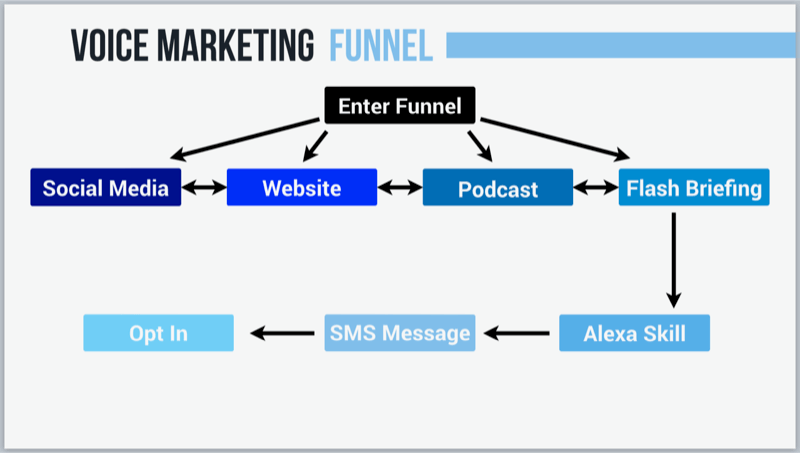
This next graphic shows the different ways a user can interact with your brand (social media content, website/blog posts, weekly podcast, and daily flash briefing) with the goal of specifically driving users toward the flash briefing. By doing so, users can engage in the gamified flash briefing and become inclined to enable the accompanying Alexa skill to play the game, ask for more information by SMS, and eventually opt into the contest and email list.
Now that you understand the structure of the voice marketing funnel, it’s time to roll up your sleeves and get down to business. The first step is to make these initial decisions to outline your voice marketing campaign:
- Campaign goals (e.g., increase social media engagement, reward listeners, thank supporters, increase email list opt-ins)
- Campaign length
- Prize package for the giveaway
- Flash briefing content (e.g., 14 days of riddles)
#2: Upload and Schedule Your Flash Briefing Episodes
The next step is to pre-record your individual flash briefing episodes, and upload and schedule the content through your content host. The steps below explain how to upload and schedule your content using Acast (with plans starting at $25/month). If you choose a different host, the process should be similar.
Note: Make sure you schedule the content enough in advance that you have time to create your custom Alexa skill (as outlined in step #3).
After you sign up for an Acast account, log in and click on your flash briefing show. Then click New Episode to add a new flash briefing episode.
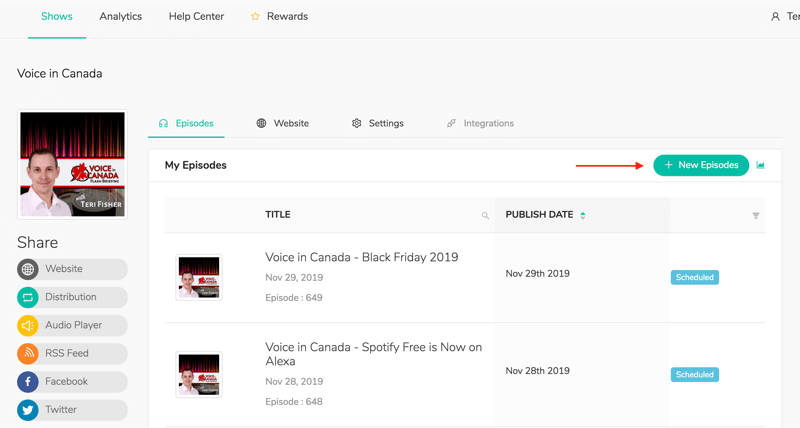
At the top of the New Episode page, click on Episode Audio File and navigate to your flash briefing audio file to upload it to the host.
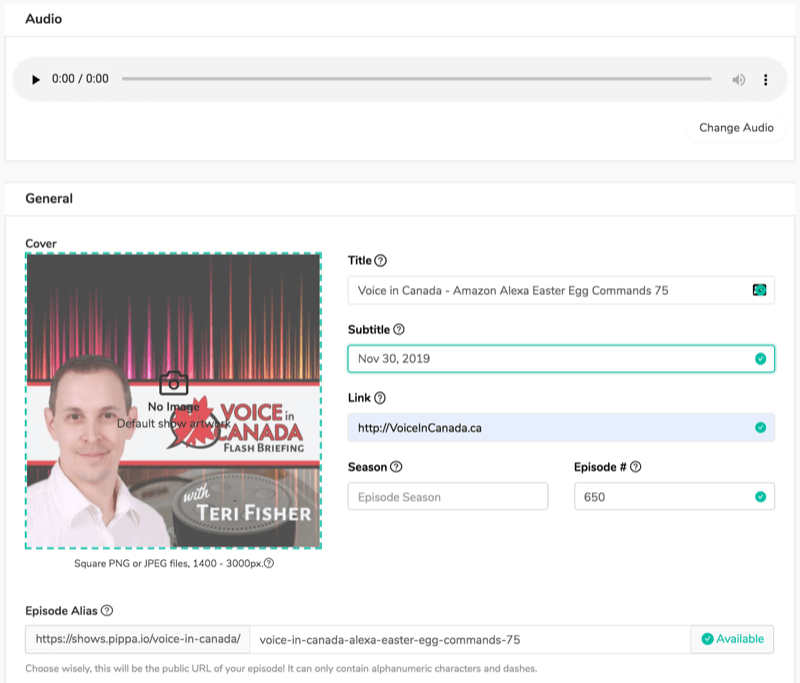
Next, fill in a title for your episode. I recommend starting the episode title with the title of your flash briefing show, followed by a colon or dash, and then the title of the particular episode (“Voice in Canada – Amazon Alexa Easter Egg Commands 75”). This way, the show name will be visible whenever the flash briefing is played on an Amazon Alexa device with a screen.
Below that, add a subtitle for the episode. I normally use the date for my flash briefings. However, you could add a relevant subtitle with pertinent keywords, which would show up in podcast players. (And yes, I recommend sharing your flash briefing as a podcast as well.)
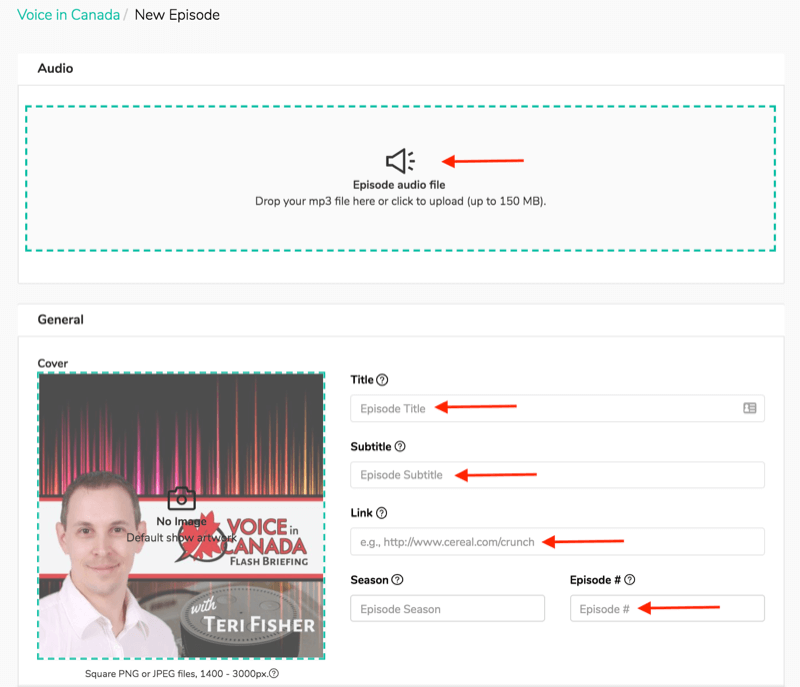
For the link, direct traffic to a location of your choice. For my gamified flash briefing, I directed the traffic to my flash briefing game landing page.
Optionally, add a season number. I’ve chosen not to do this and simply include a running number of my flash briefing episodes in the episode # field.
Note: The cover art is relevant only if you plan to share your flash briefing on a podcast. In any case, the flash briefing icon will have already been selected when you initially set up the flash briefing with Amazon.
In the screenshot below, the audio file has been uploaded, the fields have been completed, and the episode alias has been automatically generated (you can edit this if you want).
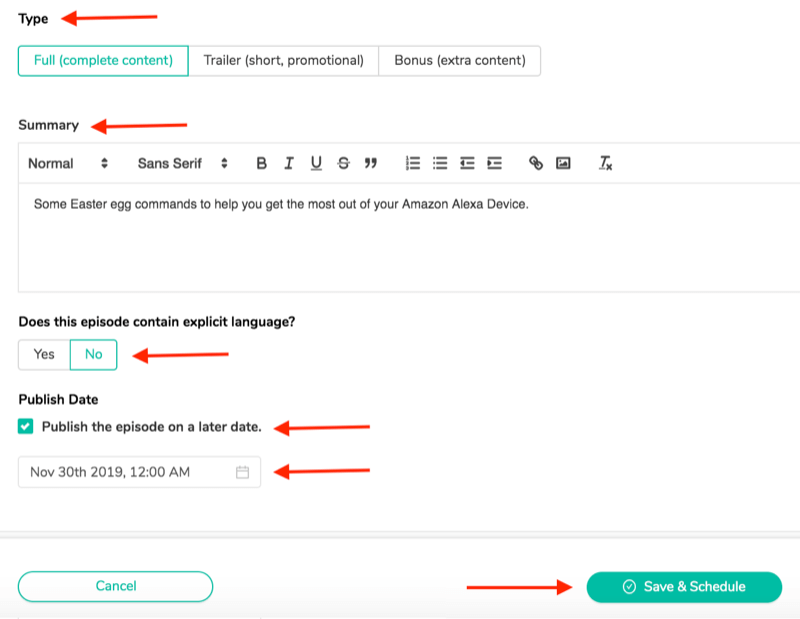
Now scroll down and complete the rest of the required fields at the bottom of the page:
- Leave Type set to Full (Complete Content).
- Enter a summary of the episode.
- Note whether the episode contains explicit language.
Then select the Publish the Episode on a Later Date checkbox and choose the publish date and time. I recommend midnight for the time so that no matter what time people listen to your flash briefing during the day, it will be available for the entire 24-hour period.
Repeat the above process for each of your individual briefcast episodes.
#3: Create an Amazon Alexa Interactive Skill
Once you’ve scheduled your episodes, it’s time to move on to setting up the custom Amazon Alexa interactive skill.
Use the platform of your choice to create your skill. In this article, I show you how to use the VoiceXP platform to create a custom game skill. (You’ll need to sign up for one of the paid VoiceXP plans, which start at $29/month.) In the steps and screenshots that follow, I show the required fields you’ll fill out. There are optional fields that you can complete as well.
Enter General Information About Your Skill
Log into VoiceXP, and under Your Voice Experiences, click on Create One.
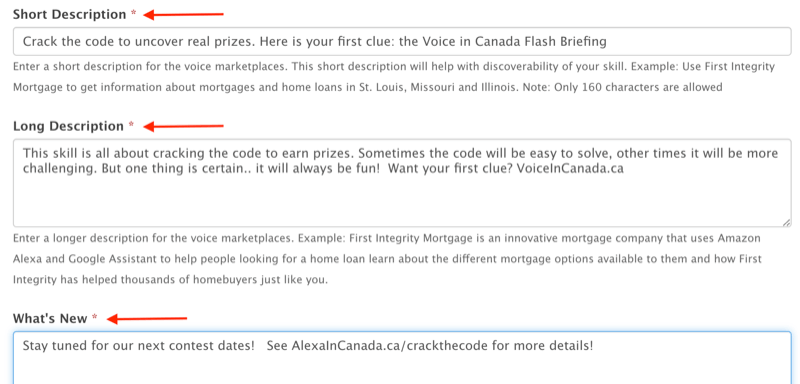
In the Global Deployment Options section, select the countries in which you want to deploy this skill. Choose Canada, United Kingdom, India, and Australia to have your skill deployed to all of the Amazon-supported English-speaking regions. The United States is automatically included.
In the Name Your Voice Experience field, type in the name of your skill.
Then enter the invocation phrase for this skill. This is the phrase people should say to start the voice interaction. Often, this phrase will be the same as the name of the skill. This should be in lowercase letters. In my example, people would say, “Alexa, open/start crack the code.”
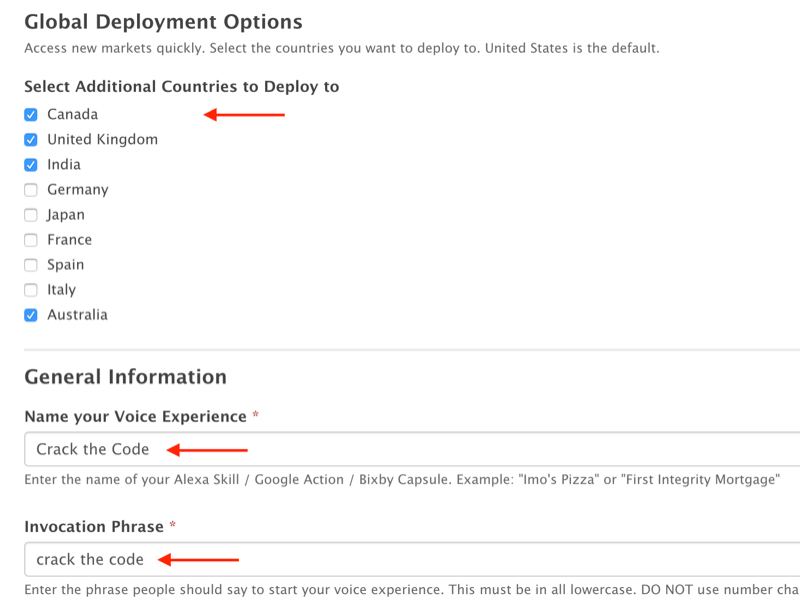
Now enter a short description of your skill. The terms you choose will help with the discoverability of the skill. The maximum length for the short description is 160 characters.
Also enter a long description for your skill, which will be visible when people click on your skill on the Alexa Skills store. Again, this will help improve discoverability when people are searching for related products on Amazon.
The What’s New field is required if you’re updating your skill but it’s good practice to always include something in this field.
Next, scroll down to the Keywords section and enter up to 30 relevant keywords for your skill. Pick keywords that people will search for that apply to your brand.

Add Email Addresses for Beta Testers, Analytics, and Notifications
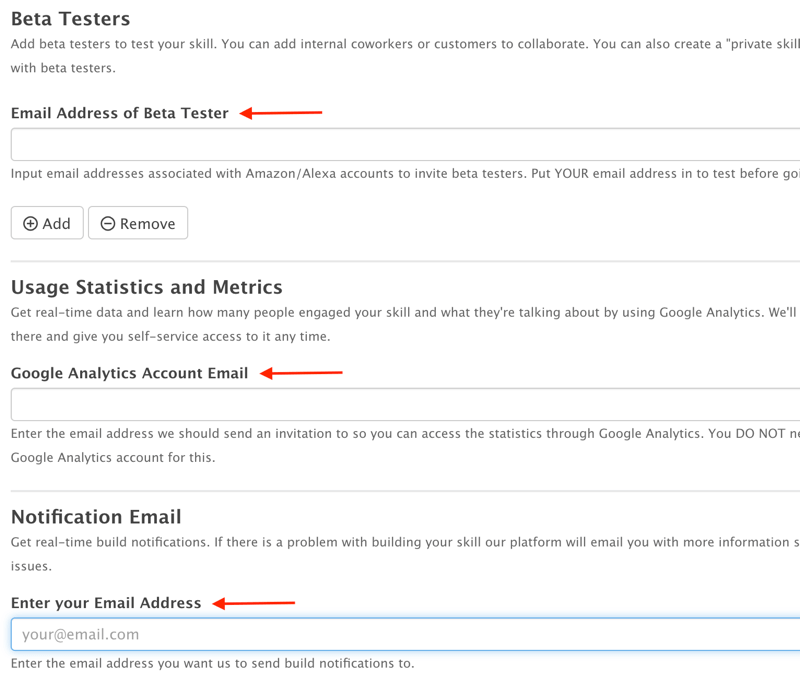
Next, enter the email addresses of any beta testers you want to include. (Click the Add button to add more than one.) Make sure the email addresses you enter correspond with the email addresses of beta testers’ Amazon accounts. That way, the beta testers can test the skill on their Amazon Echo/Alexa devices that are registered to their Amazon accounts. Don’t forget to include your own email address so you can test it too!
In the Google Analytics Account Email field, add an email address so you can track the use of your skill through Google Analytics.
Also enter your email address in the Notification Email section. This is how VoiceXP will communicate with you to update you on the skill certification process and in case there are any issues with your skill.
Put Google Analytics to Work for Your Business

Ever thought, "there's got to be a better way" when it comes to tracking your marketing activities? Are you forced to make decisions based on limited data? With the right training, you can use Google Analytics to measure all of your marketing efforts with certainty. You’ll stop the leaks in your ad spending, justify your marketing spend, gain the confidence you need to make better marketing decisions, and know what’s working at every step of the customer journey. Let the world's leading analytics pro show you the way. Check out our new Google Analytics for Marketers course from your friends at Social Media Examiner.
Then click Next to move on to the next page and start building the skill.
Choose a Custom Voice for Your Skill
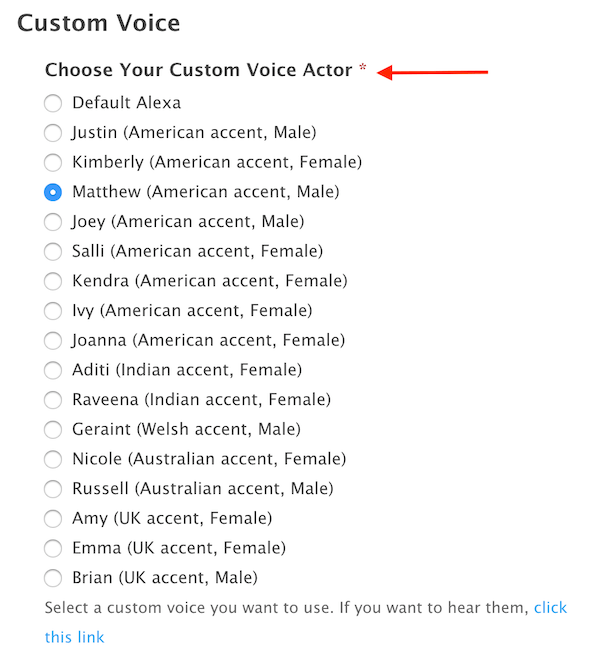
In the Custom Voice section, choose the voice for your Alexa skill. You can click the link at the bottom of the list of voices to hear samples of each.
Set Up Greetings and Messages
Next, set up the welcome greeting. This is the greeting the user will hear from Alexa the first time they open the skill.
Under Select the Type of Greeting You Want to Provide, select Text to Speech to enter the text that you want Alexa to say. Or you can play (and upload) an audio MP3 if you prefer.
Type in your first-time welcome message text. Note that you can add sound effects to your text by adding the appropriate sound effect label. Click here for a list of possible sound effects. To determine the correct label for the sound effect, find the sound effect name in the table, remove the spaces and parentheses, and then type in the label in lowercase letters only, with a colon on either end (for instance, :gameshowbridge1:).
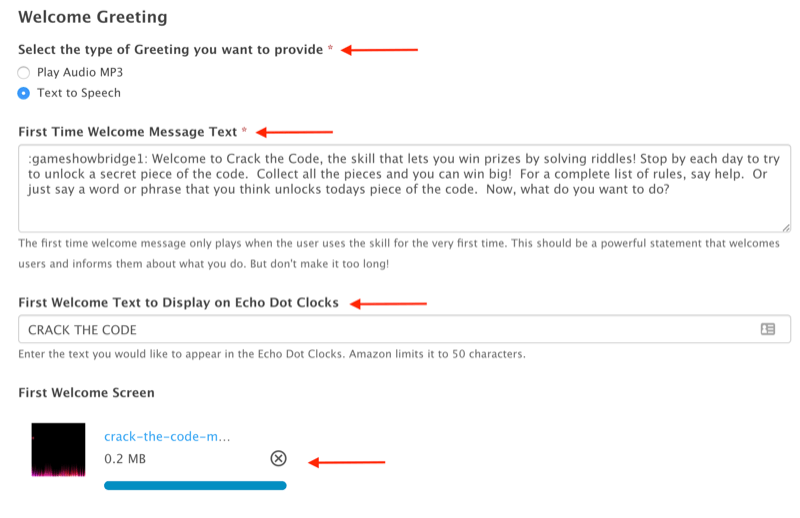
If you want to display a short text message on the Echo Dot with a clock, enter it in the appropriate field. You can also upload a background graphic (1024 x 600 PNG or JPG) to display on Echo devices with a screen.
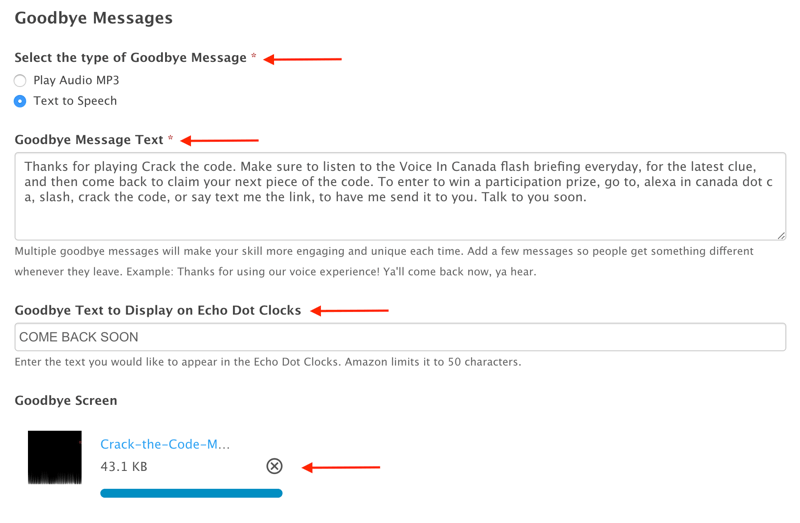
Next, set up the welcome back and goodbye messages that users will hear when opening the skill after the first time and when saying goodbye, respectively. Complete the fields using the same instructions as above.
If you want, you can add multiple welcome back and goodbye messages to create variety in Alexa’s responses.
Select Help Menu and Error-Handling Messages
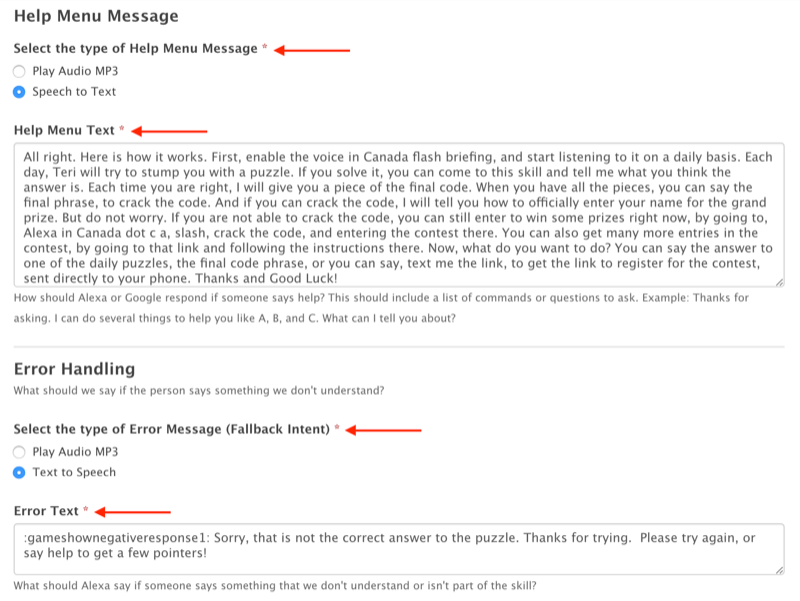
Now set up the help menu and error handling messages, both of which are important:
- Select the Type of Help Menu Message: Choose Text to Speech and then enter your help menu message. This is the response users will hear if they ask Alexa for help with your skill.
- Select the Type of Error Message (Fallback Intent): Select Text to Speech and enter your error message. This is what users will hear if Alexa doesn’t understand what they said. You have the option of entering multiple error messages.
Add Questions and Answers
Now let’s have some fun. This is where you get to design custom dialog for your skill. You choose what the user says and then how Alexa responds!
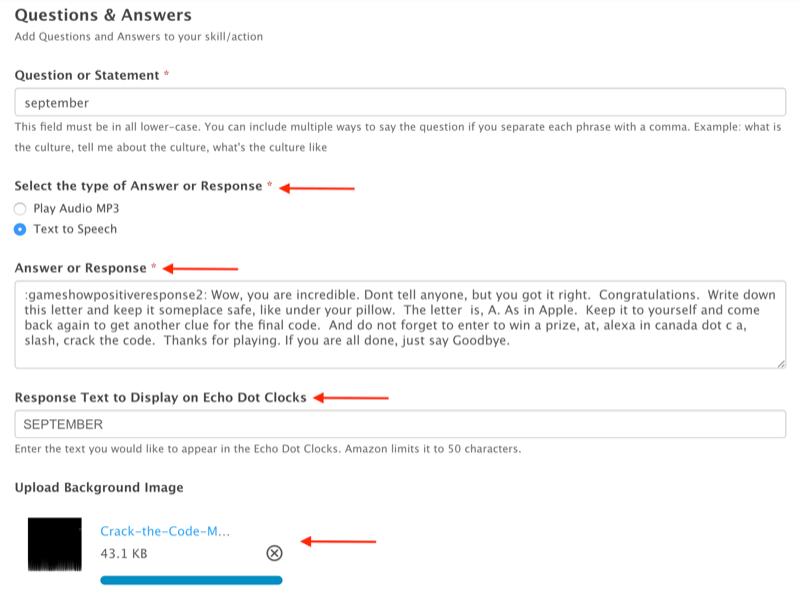
Under Question or Statement, type in what the user will say to trigger Alexa to say a particular response. This could be a question, statement, or word. Make sure you enter this in all lowercase letters.
Pro Tip: Enter multiple ways a user could say the same thing, separated by commas.
Under Select the Type of Answer or Response, choose Text to Speech to enter the text that you want Alexa to say. Or you can play an audio MP3 if you prefer, although this is more difficult to make changes to if you need to update the skill in the future.
Then type in your answer or response. Use punctuation liberally to make Alexa sound more natural. She will speak with a short pause after every comma and a longer pause after every period.
If you want to display a short text message on an Echo Dot with a clock, enter it in the appropriate field.
Then upload a background graphic (1024 x 600 PNG or JPG) to display on Echo devices with a screen.
Click the Add button to add other Question or Statement fields to build out the skill with as many interactions as you like.
Upload a Skill Icon
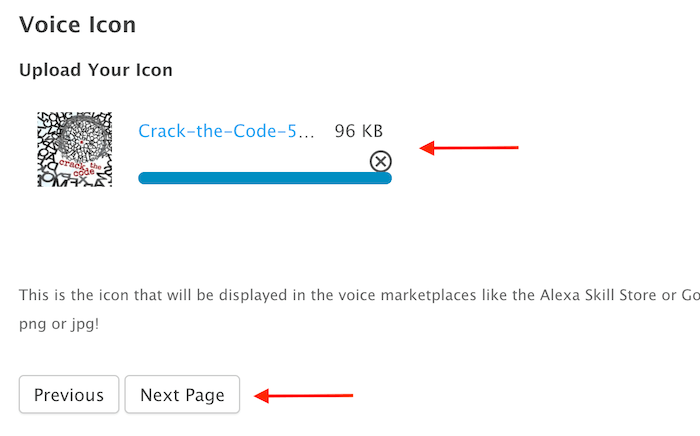
When you’ve finished creating your series of questions and answers, upload your skill icon. This should be a 512 x 512 PNG or JPG file that will be visible in the Alexa Skills Store. Click Next Page when you’re done.
Set Up Lead Generation Options
Setting up the Leadgen options is where the list-building magic happens.
Start by entering your business contact phone number and email address. This is where notifications of new leads will be sent. Make sure to use the correct format in the phone number field. You’ll have the option to enable or disable this feature later.
Next, enter the invocation phrase that users will say to prompt Alexa to send a text to them. There are many uses for this field: get a quote, send a coupon, and things like that. In the example, I used the invocation phrase as a way for the user to state the solution to the Crack the Code game. This then prompted a specific interaction by Alexa to tell users that they had “cracked the code,” followed by information on how they could register themselves for the prize drawing.
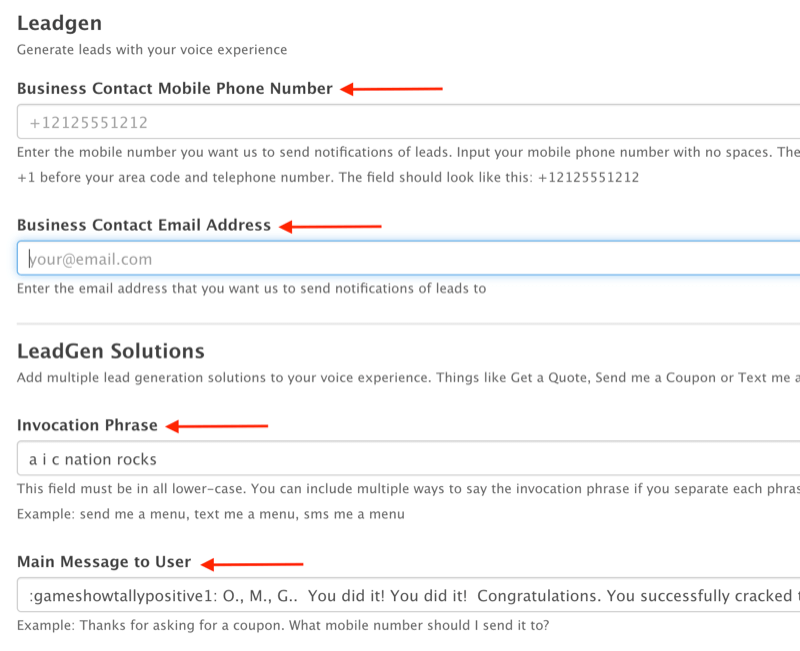
Under Main Message to User, enter what Alexa will say when the invocation phrase is said (have Alexa congratulate the user and then provide information on how to enter the drawing for the prizes, for instance). Be sure to include a question such as, “What number should I send the information to?” so you can capture the user’s number and send them the SMS message.
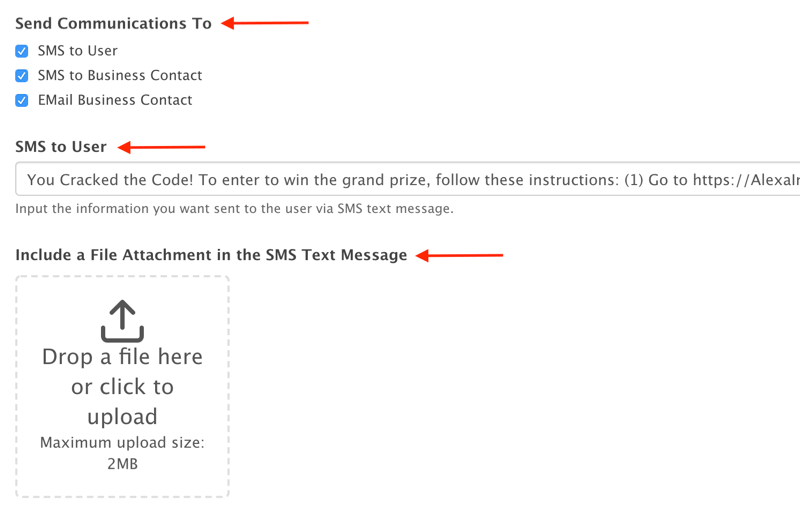
Next, select relevant Send Communications checkboxes. Here’s a rundown of these options:
- SMS to User: Send a text to the user whenever this lead-gen feature is activated (highly recommended).
- SMS to Business Contact: Get a text notification every time a user activates this lead-gen feature.
- Email to Business Contact: Receive an email notification every time a user activates this lead-gen feature.
If you selected the SMS to User checkbox, enter the text message you’ll send to the user in the SMS to User field. Include a link to your contest landing page in the SMS message to allow the user to opt in. This is how you can capture email addresses and grow your email list.
If you want, you can also include a file attachment in the SMS message. This is optional.
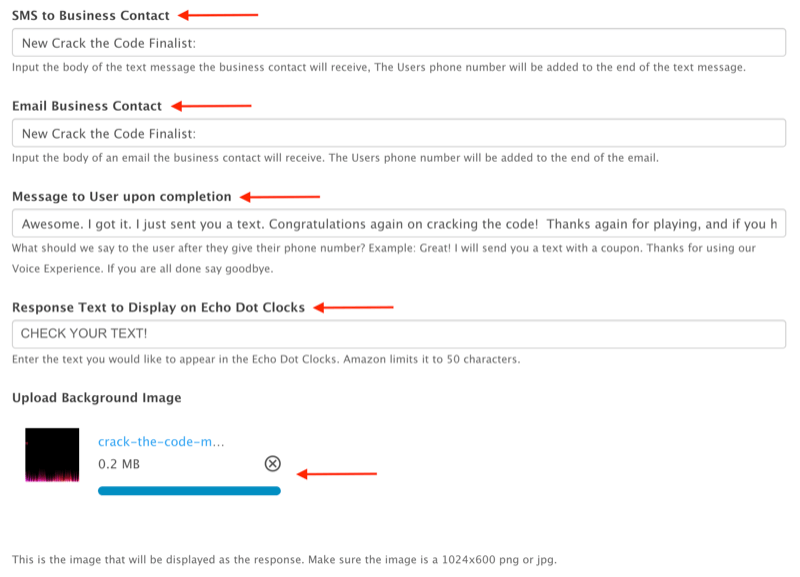
Finally, scroll down and finish up with the last few lead-gen options:
- SMS to Business Contact: What to include in the text message you receive. The user’s phone number will be added to the end of the text message.
- Email Business Contact: What to include in the email message you receive. The user’s phone number will be added to the end of the email message.
- Message to User Upon Completion: What Alexa will say to the user once she has asked for and received the user’s phone number.
Optionally, include response text to display on Echo Dots with a clock. I recommend including a short call to action such as “Check your text!”
Finally, upload a background graphic (1024 x 600 PNG or JPG) to display on Echo devices with a screen.
When you’re done filling out all of the fields, click on Update and you’ve finished your skill! Now VoiceXP will submit the skill to Amazon for certification and provide you with feedback once approved (or notify you if there are any issues with the skill). This process can take a few business days.
Pro Tip: Make sure you beta test the skill before the contest launch date so you know everything is working the way you want. You can always go back and update the skill as appropriate.
#4: Set Up the Contest for Your Voice Marketing Funnel
The final step for setting up your voice marketing funnel is to choose a contest app to host your contest and create the contest in the app. These steps walk you through how to create a contest using KingSumo (available in free and paid plans, starting at $19/month).
Once you’ve logged into your KingSumo account, click the New Giveaway button to create a new giveaway.

Enter Details About the Giveaway
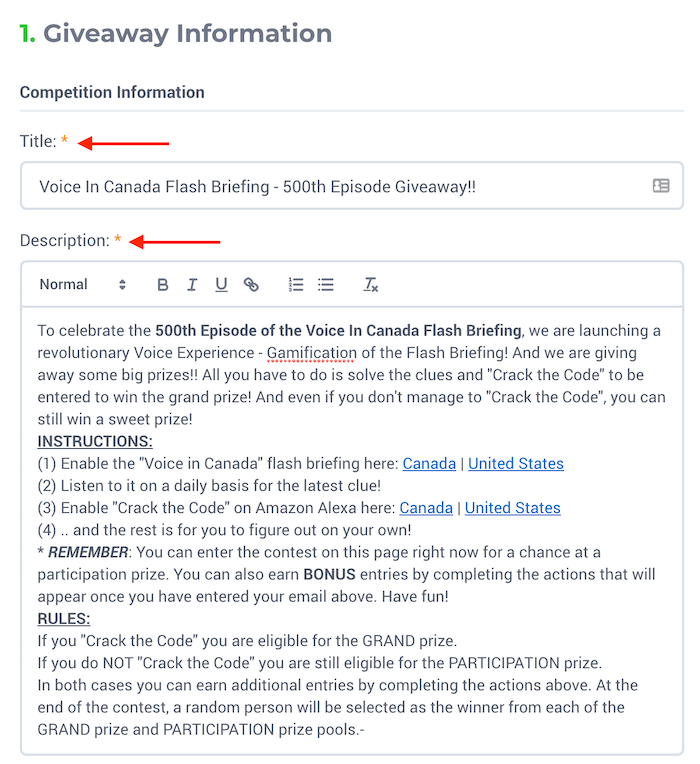
Start by entering a title and description for your giveaway. Be sure to include the rules of the contest and explain how people will participate. It’s also a good idea to include this information on the landing page for the contest.
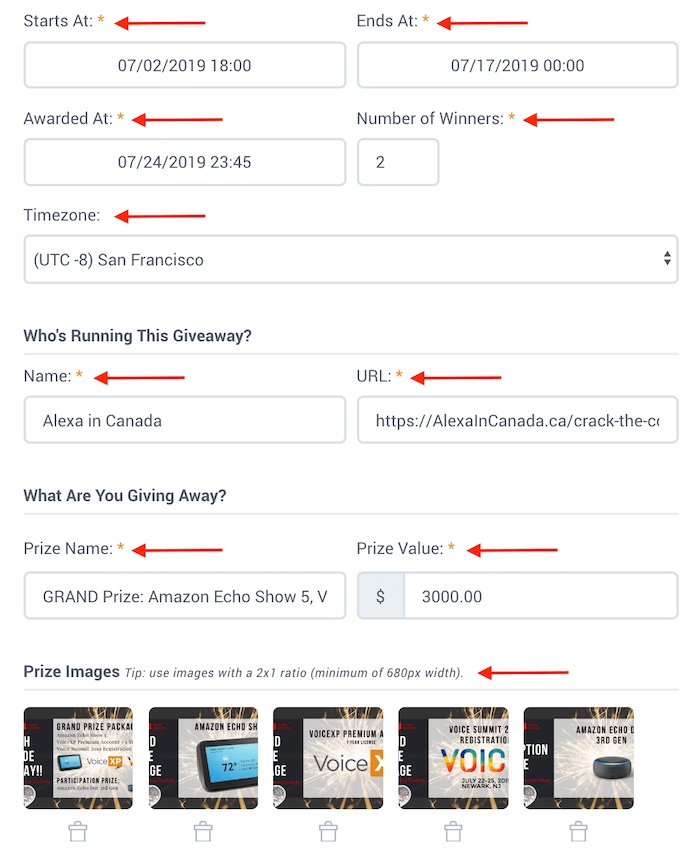
Next, enter the scheduling details for the contest. Enter a start and end time, specify when the prizes will be awarded, and select your time zone. I recommend running the contest for 1-2 weeks and awarding the prizes a few days after the end date so you have time to select the winners.
Also enter the number of winners. For my contest, I had two winners: a grand-prize winner who “cracked the code” and a participation prize. This way, even users who couldn’t solve the game would still be eligible for a prize, which encouraged social sharing.
Under Who Is Running This Giveaway?, type in your name and the URL of the contest landing page.
Then type the prize name and value. I entered a list of prizes in the Prize Name field and the total value of those prizes in the Prize Value field.
Next, upload graphics that show the prizes offered in the giveaway. I uploaded multiple images and KingSumo automatically generated a carousel effect for these graphics. The suggested specifications are a 2:1 (width:height) aspect ratio and a minimum width of 680 px.
Set Up Sharing for the Giveaway
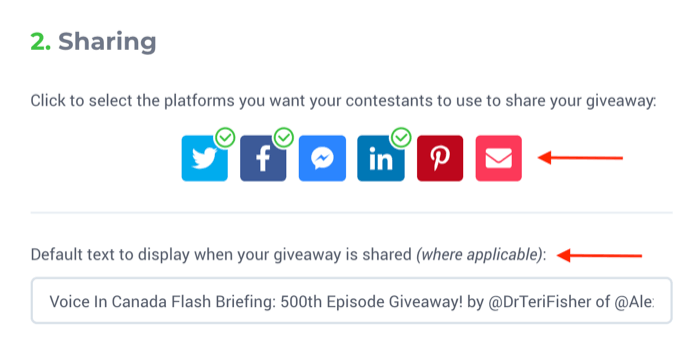
Here’s where you can use the power of social media to spread the word about your contest. Select the platforms you want KingSumo to automatically set up for the contestants to share the contest. You can choose as many as you like.
When contestants share the contest on social media, they’ll earn additional entries in the giveaway.
Enter some default text to display when people share your giveaway. This text will automatically be generated when a user shares the contest, but the user can always edit it.
Specify How Bonus Entries Will Be Handled
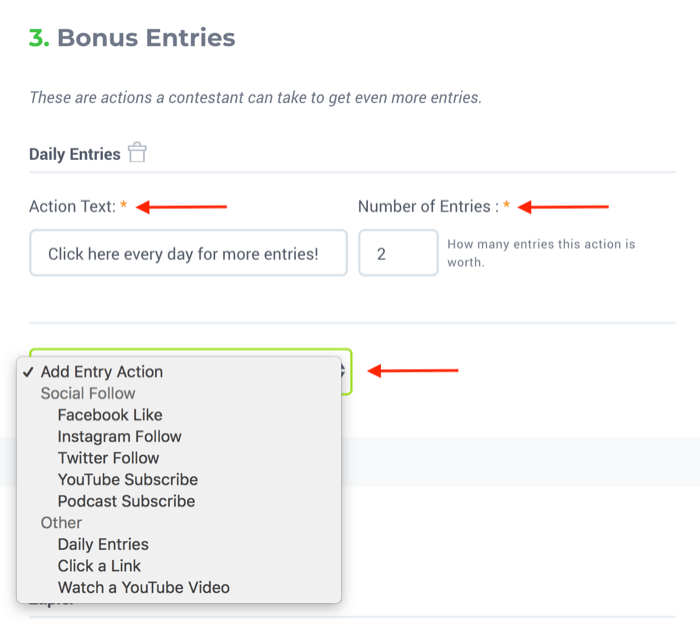
Now for some fun! In the Bonus Entries section, you can encourage users to complete other calls to action by rewarding them with bonus contest entries.
To reward contestants for visiting your contest page every day, complete the Action Text field and decide how many entries that action is worth. If you prefer to delete the daily entries, click on the garbage can icon, but I recommend leaving this in.
Next, click Add Entry Action and select the call to action you want to include. Once you make your selection, you’ll see some custom fields to complete based on the option you choose (they’re all self-explanatory).
I recommend selecting the Click a Link option, which allows you to specify a custom link for contestants to visit. I used this option to send contestants to a landing page where they could enter their answer to the Crack the Code game so I could verify that they solved the game. Additionally, it allowed me to capture their email address.
If you want to use the online automation tool Zapier (available in free and paid plans, starting at $24.99/month) to trigger other apps when contestants enter your contest, you can enable that option here. (Setting up Zapier integrations is beyond the scope of this article.)

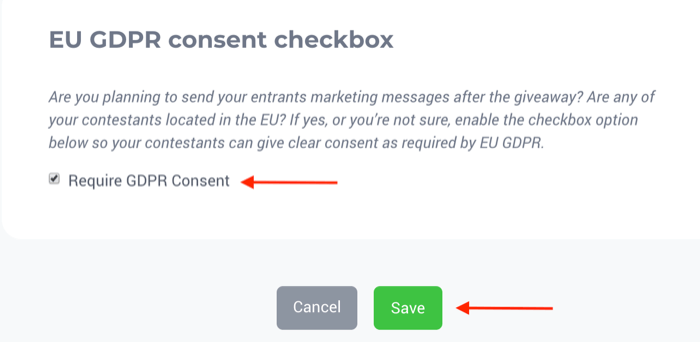
If your contestants will be located in the EU, select the checkbox next to Require GDPR Consent. I recommend turning this on, just in case. Then click Save and your contest is ready to launch!
Promote the Giveaway
Now you want to promote the giveaway and embed the contest app on the game/opt-in landing page on your website.
Go back to your KingSumo dashboard and click on Promote. If you’re using a different contest app, you should see a similar feature.

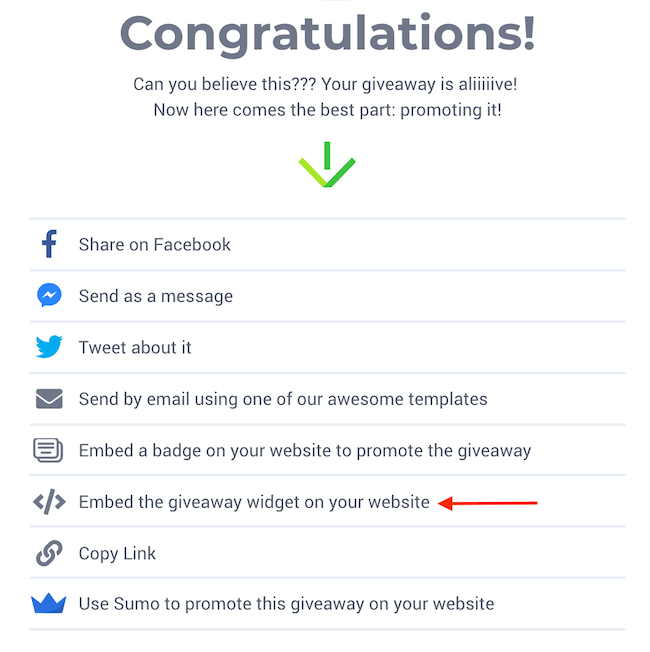
Go through all of the available promotional options by clicking on each line and following the specific instructions. Make sure to click on Embed the Giveaway Widget on Your Website to do just that.
Click the Copy button to grab the HTML code. Then go to your website or contest landing page to embed the contest widget.
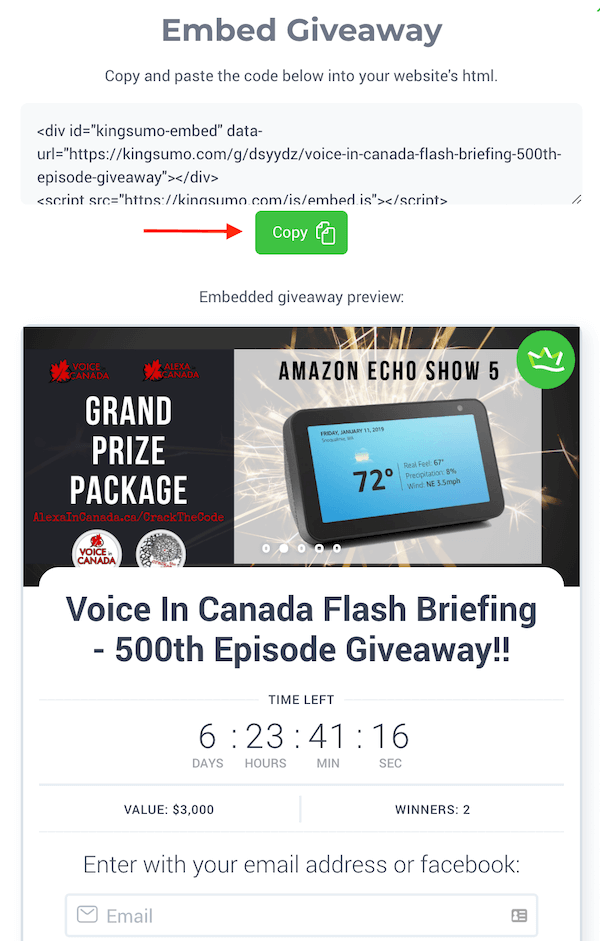
Congrats! You’re all set. Now whenever contestants go to your landing page and enter their email address, they’ll be presented with options to share the contest on social media and earn additional entries.
The only thing left to do is launch your voice marketing funnel contest and promote it like crazy!
#5: Increase Social Media Engagement by Rewarding Social Sharing
One of the key components of a successful contest is encouraging participants to share the contest on social. As you’ve seen, this is easy to do with the KingSumo contest app. For my contest, I set up bonus entries for each of the following:
- Enabling the flash briefing
- Subscribing to the podcast
- Visiting the website/blog on a daily basis
- Following me on Twitter
- Sharing the contest on Twitter
- Sharing the contest on Facebook
- Sharing the contest on LinkedIn
- Solving and entering the final code
Conclusion
The distribution of content through Amazon Alexa flash briefings is still very new so now is the time to take advantage of this opportunity and solidify your brand’s presence as the leading authority in your niche. By following the steps in this article, you can maximize the potential of voice technology in a voice marketing funnel and in turn drive engagement on your social media platforms.
What do you think? Are you inspired to create your own voice marketing funnel with Alexa flash briefings? Share your thoughts in the comments below.


0 comments :
Post a Comment